05 February 2013

Less than 10 minutes


 Seriously, each card was less then 10 minutes from start to finish. I can't give a real time since I was sidetracked watching a Video Countdown on TV and playing Chefville (yeah, I know multitasking is bad for your health!) I started my stop watch on the 3rd card hoping it would keep me on track! HUH!!

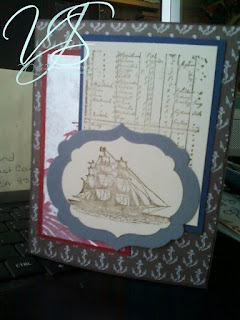
This is my first. I did it on Sunday. I saw one on Pinterest using that Nautical DP and decided to make something using it too. I had to open the package...yeah that is awful! (here's the card I found)
Grabbed my scrap box and dug out some Not Quite Navy, Basic Grey, Cherry Cobbler and Sahara Sand. Even with guessing at the measurements and creating a layout ( I had to use the ship stamp) it seemed like a fast card. I Pierced around the Cherry Cobbler Die Cut. I cut another piece of Sahara Sand for the inside since my base is Not Quite Navy
Well I love Monochromatic cards so on Monday I decided to make this one. The Base and DP is Rose Red, the image piece and inside is Pink Pirouette
Deciding on the stamp came after staring at the pieces for an hour!  So this card doesn't count for less than 10 minutes! 
Just kidding, I bought Tea Shoppe when it came out and dumb dumb me purchase it in FRENCH! so now I just don't use it much. So I grabbed the little flower out of there, Always Artichoke and Rose Red markers and here ya go!
Well now this morning I decided to time it, started the stop watch on my cell phone....
Got out the DP again, took down my scrap box, got the Open Sea Stamp Set, Soft Suede Ink 
I am disappointed though, I cut the DP so I could have the little Island in the corner, but it got covered up! 
Even with serving up my food on Chefville and looking up a the TV I got this done in less then 10 minutes
 ( 8 something actually )
Anchor DP is 4 1/8" x 5 3/8"
Cherry Cobbler 4 3/4" x 2 3/4"
DP 4 1/2" x 2 1/2"
Not Quite Navy 3 3/4" x 2 3/4" (because that's the size needed for the ledger stamp)
Sahara Sand Ledger piece 3 1/2" x 2 1/2"
Basic Grey 3 1/2" x 3" (but I cut it with label die so I didn't cut it out first)
I stamped the Ship on a scrap of Sahara Sand then cut it

04 February 2013

020113 - VSBN Warm Up - Pick Your Valentine

My words are purple! 


Lela's Challenge
"I stopped at Walgreens last week (unfortunately for cold meds) and walked through the Valentine Aisle of goodies. Oh what memories it brought back of the process of choosing just the right Valentines for everyone on the list. Oh yes, it was so important not to give "gushy" or "mushy" ones to boys you didn't like, right? 

It was also important to make sure you brought home your list of classmates so everyone got a Valentine. It was "bad form" to miss someone, LOL!

VSBN Share the Love Event will soon be here and we want to be sure that all of our Challenge Threads Feel the Love. So this is your Chance to Pick Your Favorite Valentine

Listed below is the links to ALL of our SCS Scrapbook Challenges. Just so no one is left off our list, I challenge you to do a PAGE / LAYOUT using 2 or more Challenges. The More the Merrier! So for instance, you might pick a Lyric/Quote Challenge, a sketch from Friday Sketch Challenge and add a theme from Inspiration Challenge --- or how about a Variety Idea with one of the fun Progressive Digi Challenges. Hearts and Flowers to all of you who can get 3 or more challenges to work for your page/layout. 

This is your chance to Pick Your Favorite Valentine"


Mondays -- Inspiration - Posted 1st & 3rd Monday
Tuesdays -- Digi-Scrapping - Posted Every Tuesday
Wednesdays -- Variety - Posted 2nd & 4th Wednesday
Thursday -- Music & Quotes - Posted Every Thursday
Friday -- Sketch -- Posted Every Friday

Inspiration is Romance
What says Romance better than Roses!

Digi - Technique
Diane "I've chosen three different techniques to showcase this week. You do not have to do all three, but I encourage you to try it even if you haven't done it before. 
"Grouped Photo Boxes" -- Create several photo boxes on your page, and group them together. Allow your one photo to encompass all the photo boxes.
"Re-Coloring Embellishments" -- take any embellishment and re-color it to make it your own.
"Multi-Colored Stamps" -- Use any stamp and color it using different"


I made all of my photos touch for the GROUPED PHOTO BOXES
Using Word Art tried to make 2009 look like a metal 


Variety - Cheryl
"When I was a kid, I loved those paint by the numbers pictures. Your challenge this week is to pull out the paints and do some painting on your layout. It could be edging your photos, creating a background using dots of paint, decorating a chipboard title, etc. And for the "by the numbers" part, make sure you have a number somewhere on your page."

Tried to make 2010 look like sponged ink and 2008 is cork board.

Got the years for each photo


Music & Quotes

Patti - "Ask not what you can do for your country. Ask whats for lunch! Orson Wells

Make your page about food!


Roses taste great! so was the box of chocolates!


02 February 2013

Paper Bloggers Unite Blog Hop


Don’t you just LOVE Blog Hops?
And what better time to host one then the Season of Love!

We are a group of ladies from SplitCoastStampers who formed Paper Bloggers Unite!
This weekend we want to inspire your Season Of Love projects… whether it’s creating
something for that special someone or just because you want to play.

To be inspired, simply click on each of the links below to see what the Paper Bloggers
have come up with and leave a comment.

Some of the ladies have Blog Candy to give away to one lucky person leaving a
comment.

But there’s more! Kelly, our coordinator, will put all the names (yes, from all the comments
across the hop) into one big drawing for a Little Bit of Everything package.

We have products by:
Terry Medaris Art Stamps (Thanks Terry!)
Darice Embossing Essentials
Studio 18
MyMindsEye
And more!

Here are the links to each of the Paper Bloggers Unite Blogs:


Brenda – Disney Girl

Jackie – Kreate With Me 2


VikkiJo – VikkiJo’s Corner


I cut 2 Stampin' Up! Milk Carton Die out of Pretty In Pink


Adorning Accents Embossing Hearts Folder and Scallop Edgelits


Silver Glimmer Paper (Oh I love this stuff...just haven't brought myself to cut it often!)


 Embossed with Adorning Accents Hearts Folder - 
Milk Carton Folded in half (yes 2 sides are Embossed and 2 are Debossed)


Stamp the words on before Folding into shape (live and learn! LOL)


 I cut a scallop off the end to hide the mismatching scallops at the meeting point


I must give credit where credit is due...the tutorial for this carton caddy came from Kim Score
She has some wonderful ideas! 

After the you finish the Paper Bloggers Unite Hop....go check out her blog!


Using SU Markers directly on the stamp, I used Real Red for the Heart...cleaned the stamp off then did the words in Basic Black across the Heart (like you can't see that right LOL) In all honesty I had stamped it as one stamp only to realize it didn't fit in the tag punch, so I redid the words again!
I thought I'd do a tag on each carton then changed my mind! Stuck it in the center to the caddy. Maybe I'll make a card with the extra one.


My Space

 The She Shed.